Replenish on order (MTO)
Replenish on order, also known as MTO (make to order), is a replenishment strategy that creates a draft order for a product every time it is required to fulfill a sales order (SO), or when it is needed as a component in a manufacturing order (MO).
For products that are purchased from a vendor, a request for quotation (RFQ) is created to replenish the product, while an MO (manufacturing order) is created for products that are manufactured. The creation of an RFQ (request for quotation) or MO (manufacturing order) occurs every time an SO (sales order) or MO (manufacturing order) that requires the product is confirmed, regardless of the current stock level of the product being ordered.
WARNING
In order to use the MTO (make to order) route, the Multi-Step Routes feature must be enabled. To do so, navigate to Inventory app ‣ Configuration ‣ Settings, and tick the checkbox next to Multi-Step Routes, under the Warehouse heading.
Finally, click Save to save the change.
Unarchive MTO route
By default, Odoo sets the MTO (make to order) route as archived. This is because MTO (make to order) is a somewhat niche workflow that is only used by certain companies. However, it is easy to unarchive the route in just a few simple steps.
To do so, begin by navigating to Inventory app ‣ Configuration ‣ Routes. On the Routes page, click the fa-caret-down (down arrow) icon on the right side of the search bar, and click the Archived filter to enable it.
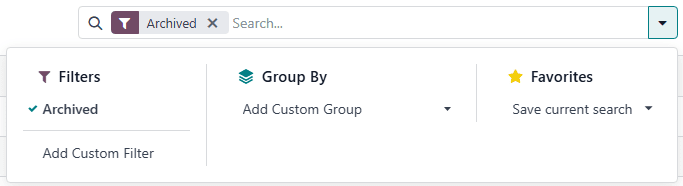
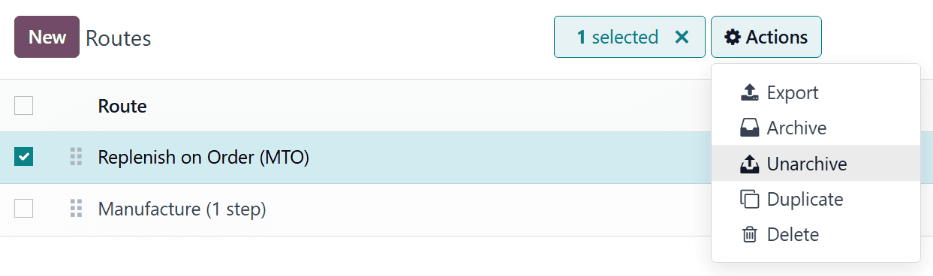
After enabling the Archived filter, the Routes page shows all routes which are currently archived. Tick the checkbox next to Replenish on Order (MTO), then click the fa-cogActions button to reveal a drop-down menu. From the drop-down menu, select Unarchive.
Finally, remove the Archived filter from the search bar. The Routes page now shows all unarchived routes, including Replenish on Order (MTO), which is selectable on the Inventory tab of each product page.
Configure product for MTO
With the MTO (make to order) route unarchived, products can now be properly configured to use replenish on order. To do so, begin by going to Inventory app ‣ Products ‣ Products, then select an existing product, or click New to configure a new one.
On the product page, select the Inventory tab and enable the Replenish on Order (MTO) route in the Routes section, along with the Buy or Manufacture route.
WARNING
The Replenish on Order (MTO) route does not work unless another route is selected as well. This is because Odoo needs to know how to replenish the product when an order is placed for it (buy or manufacture it).
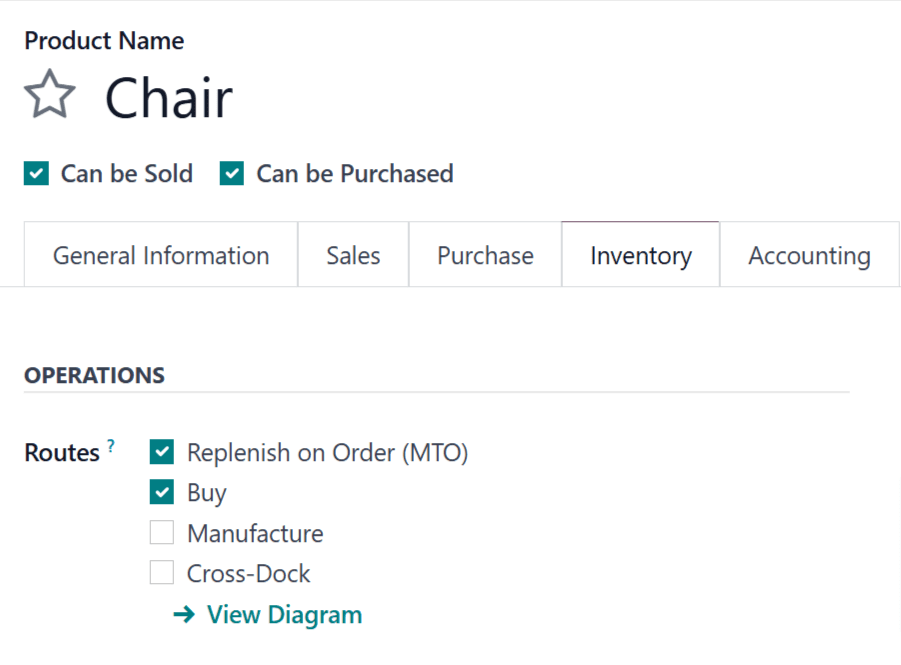
If the product is purchased from a vendor to fulfill SOs (sales orders), enable the Can be Purchased checkbox under the product name. Doing so makes the Purchase tab appear alongside the other tabs below.
Click the Purchase tab and specify a Vendor and the Price they sell the product for.
WARNING
Specifying a vendor is essential for this workflow, because Odoo cannot generate an RFQ (request for quotation) without knowing who the product is purchased from.
If the product is manufactured, make sure it has a bill of materials (BOM) configured for it. To do so, click the Bill of Materials smart button at the top of the screen, then click New on the Bill of Materials page to configure a new BOM (bill of materials) for the product.
Replenish using MTO
After configuring a product to use the MTO (make to order) route, a replenishment order is created for it every time an SO (sales order) or MO (manufacturing order) including the product is confirmed. The type of order created depends on the second route selected in addition to MTO (make to order).
For example, if Buy was the second route selected, then a PO (purchase order) is created upon confirmation of an SO (sales order).
WARNING
When the MTO (make to order) route is enabled for a product, a replenishment order is always created upon confirmation of an SO (sales order) or MO (manufacturing order). This is the case, even if there is enough stock of the product on-hand to fulfill the SO (sales order), without buying or manufacturing additional units of it.
While the MTO (make to order) route can be used in unison with the Buy or Manufacture routes, the Buy route is used as the example for this workflow. Begin by navigating to the Sales app, then click New, which opens a blank quotation form.
On the blank quotation form, add a Customer. Then, click Add a product under the Order Lines tab, and enter a product configured to use the MTO and Buy routes. Click Confirm, and the quotation is turned into an SO (sales order).
A Purchase smart button now appears at the top of the page. Clicking it opens the RFQ (request for quotation) associated with the SO (sales order).
Click Confirm Order to confirm the RFQ (request for quotation), and turn it into a PO (purchase order). A purple Receive Products button now appears above the PO (purchase order). Once the products are received, click Receive Products to open the receipt order, and click Validate to enter the products into inventory.
Return to the SO (sales order) by clicking the SO breadcrumb, or by navigating to Sales app ‣ Orders ‣ Orders, and selecting theSO (sales order).
Finally, click the Delivery smart button at the top of the order to open the delivery order. Once the products have been shipped to the customer, click Validate to confirm the delivery.